Back

Ex 16A: Warming up of tanks-Liquid Evaporation

The warming up of cargo tanks is performed in preparation for an upcoming dry dock. This operation is carried out after the tanks have been emptied using the spray pumps. The primary objective is to make the tanks free of liquid and to warm the LNG vapor inside the tanks.

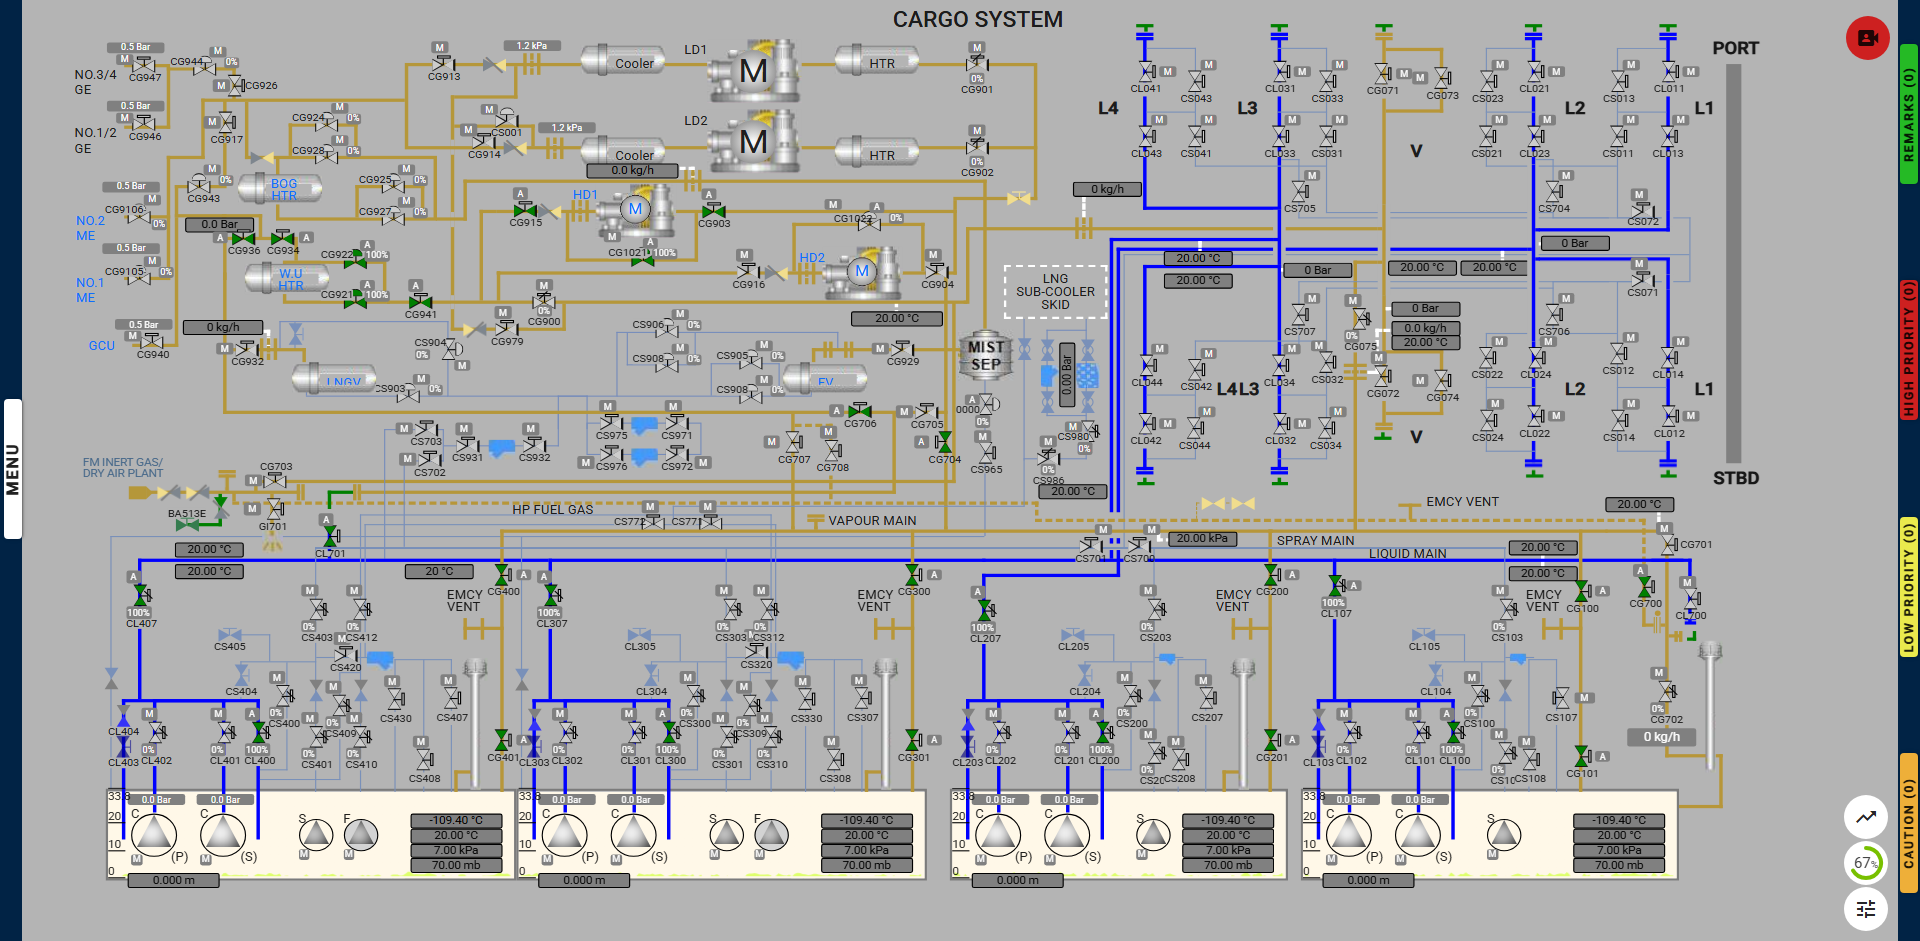
The process is conducted using the high-duty compressor (HD compressor) onboard. The vapor is pushed from the HD compressor to the LNG heater, where the temperature increases. The warmed vapor is then reintroduced into the cargo tank from the bottom, ensuring that any remaining liquid also evaporates.

Exercise Overview:

  1. Initial Setup:

  • The exercise begins by preparing the necessary equipment, including the HD compressor and the warm-up heater.
  • The required pool pieces need to be inserted correctly, and the valves must be opened to establish the proper lineup.
  • The generators must also be prepared accordingly.
  1. Assessment Process:

  • The assessment starts when the HD compressor is activated and the temperature rises in the warm-up heater. The user must successfully achieve 40°C at the warm-up heater outlet temperature.
  • During the Assessment, the user must also maintain the cargo tank pressure within the prescribed limits, as outlined in the milestones.
  1. Completion Criteria:

  • The exercise is considered complete when the user successfully achieves the required temperature and maintains the correct tank pressure.
  1. Evaluation:

  • The final evaluation is based on how the user responds to various remarks, Cautions, and alarms presented during the course of the exercise, as well as their ability to navigate the procedure efficiently.

Participants will be able to effectively demonstrate the process of warming up cargo tanks on
LNG ships to achieve a liquid-free state, understanding the necessary safety protocols,
operational procedures, and the importance of maintaining safe conditions during this
process.


Key Components:

1. Understanding the Warming Process:

  • Explain the purpose of warming up cargo tanks to remove residual LNG or
    other liquids, ensuring the tanks are ready for gas operations.
  • Identify the significance of achieving a liquid-free state for safety and
    operational efficiency.


2. Operational Procedures:

  •  Detail the step-by-step process for warming up cargo tanks, including:
    • Pre-warming checks and preparation of the cargo tanks and
      associated systems.
    • Controlled introduction of warm LNG vapour to raise the temperature
      of the tanks.
    • Monitoring temperature and pressure throughout the warming
      process.
  • Explain how to manage flow rates and ensure proper ventilation to facilitate the removal of liquid.


3. Monitoring and Verification:

  • Demonstrate the use of temperature gauges and pressure monitoring
    systems to ensure effective warming.
  • Describe methods to verify that the cargo tanks are liquid-free.


4. Practical Demonstration:

  • Simulate the warming process in a controlled environment or through hands-
    on training exercises.
  • Role-play scenarios to address potential challenges or deviations from the
    procedure.

Assessment Criteria:

  • Ability to articulate the significance of warming cargo tanks to achieve a liquid-free
    state.
  • Accurate execution of the warming procedure and effective monitoring.

By achieving this objective, participants will gain the knowledge and skills necessary for safely and efficiently warming up cargo tanks on LNG ships, ensuring they are liquid-free and ready for subsequent operations.

Exercise Milestones:

  • Learning and Training Phase – Pre-Requisites for the start of operation:
  1. Insert “Emergency Vent” labelled Spool Pieces on Cargo Tank Vapour Domes and Emergency Vent Line.
  2. Insert the 3-way Spool Piece connecting the Vapor line to the Liquid Line.
  3. Set the cargo tank vapour valves.
  4. Set the cargo tank liquid valves.
  5. Set the HD compressor valves.
  6. Set the Vapour Line WU Heater outlet to the Liquid Line Isolating Valves.
  7. Set the warm-up heater valves.
  8. Set the Emergency Vent Line to No.1 Vent Mast Valves.
  9. Prepare the warm-up heater for use.
  10. Prepare generators and the HD compressor for use.
  • Assessment Phase – Operational flow and Assessment:
  1. Start the HD compressor.
  2. Achieve 40°C in Warm-Up Heater Outlet Temperature.
  3. Monitor the Cargo Tanks Pressure and Temperature.

Actions During the Exercise:

Deviation from Exercise:

  • After starting or resuming the operation, do not open any non-required valves or close any required valves.
  • If this occurs, a caution message will be displayed, instructing the user to undo the previous action.
  • Failure to correct the action will result in the exercise being terminated.

Not Maintaining HD Compressor Flow:

  • During the initial 5-minute phase, maintain the HD compressor flow between 5,000 m³/h and 6,000 m³/h.
  • After receiving the Alarm, ensure the HD compressor outlet flow is increased. To be maintained between 11,500 m³/h and 12,500 m³/h.
  • Failure to maintain the flow will trigger alarms, with a high-priority alarm if the issue persists.
  • If the high-priority alarm is not resolved within one minute, the exercise will be terminated.

Not Opening the Warm-Up Heater Bypass Valve:

  • During the initial phase, open the steam outlet bypass valve of the warm-up heater within 1 minute of being prompted.
  • Failure to open the valve will trigger an LAHH alarm, giving the user one minute to correct it.
  • If the valve is not opened within this time frame, the exercise will be terminated.

Alarms & Remarks


Alarm Condition Alarm Time Alarm Level Alarm Title Alarm Description
remark Preparing Of Warm Up Heater Generally, the Warm-up heater is kept ready few hours prior to the operation.
remark Open Warm Up Heater Drain Bypass Valve Open the Warm Up Heater Drain Bypass valve immediately.
remark Valve CG922 To Auto Mode Set the valve output set value to 40 and change the valve to auto mode.
remark Reduce Warm Up Heater Vapour Outlet Temperature Adjust the valve CG 922 to reduce the WU heater Vapour outlet temperature to 40°C
caution Maintain Warm Up Heater Flow Adjust the HD compressor Veins and maintain the warm-up heater outlet flow between 11,500 kg/h to 12,500 kg/h.
remark Run HD Compressor At 0 Veins Run HD Compressor at 0 veins for the first 5 minutes.
caution High Pressure Inside Cargo Tanks Start the LD Compressor to reduce the pressure.
caution High Pressure Inside Cargo Tanks Start another LD Compressor to reduce the pressure.
caution High Pressure Inside Cargo Tanks Start GCU to reduce the pressure.
caution Deviation Detected Deviation from the exercise is detected, undo your last action.

Step By Step Procedure

  • Learning and Training Phase – Pre-Requisites for the start of operation:
  1. Insert “Emergency Vent” labelled Spool Pieces on Cargo Tank Vapour Domes and Emergency Vent Line:
    Connect 4 spool pieces on each of the four cargo tank vapour domes.
    Connect the “Emergency Vent” spool piece on the emergency vent line.


  1. Insert the 3-way Spool Piece connecting the Vapor line to the Liquid Line:
    Insert the 3-way spool piece connecting the Vapour line to the Liquid Line.


  1. Set the Cargo Tank Vapour Valves:
Valve Action
CG100 Open
CG101 Open
CG200 Open
CG201 Open
CG300 Open
CG301 Open
CG400 Open
CG401 Open


  1. Set the Cargo Tank Liquid Valves:
Valve Action
CL100 Open
CL107 Open
CL200 Open
CL207 Open
CL300 Open
CL307 Open
CL400 Open
CL407 Open


  1. Set HD Compressor Valves:
Valve Action
CG704 Open
CG903 Open
CG1021 Open
CG915 Open
  1. Set the Vapour Line WU Heater outlet to the Liquid Line Isolating Valves:
Valve Action
CL701 Open
CG706 Open
  1. Set Warm-Up Heater Valves:
Valve Action
CG941 Open
CG921 Open
CG922 Open
CG934 Open
CG936 Open
  1. Set the Emergency Vent Line to No.1 Vent Mast Valves
Valve Action
CG700 Open
CG702 Closed & Auto

Note: The opening percentage of CG702 ranges from 0% to 100%, corresponding to a vapour outlet flow of 0 to 20,000 kg/h.

  1. Prepare Warm-Up Heater for Use:
    • Open the warm-up heater steam inlet and drain outlet valves..
    • Note: Once the process starts, a prompt will instruct the user to open the bypass valve to remove blocks.
  2. Prepare Generators and HD Compressor for Use:
    • Ensure at least two generators are running.
    • Navigate to the PMS page via the side navigation or the “number of generators running” indicator on the HD compressor page.
    • Start one of the three generators not currently running. Note: By default, one generator will already be running.
  • Assessment Phase – Operational flow and Assessment:


  1. Start the HD Compressor:
    • After preparation, start the HD compressor to begin the warming-up process.
  2. Achieve 40°C in Warm-Up Heater Outlet Temperature:
    • During warming up, the cargo tanks’ temperature will increase from -110°C to -90°C, indicating liquid conversion to cold vapour.
    • Adjust the valve CG 922 to reduce the WU heater Vapour outlet temperature to 40°C.
  3. Maintain Cargo Tank Pressure:
    • Observe the steady increase in temperature and tank pressure throughout the warming-up phase.
    • During cargo tank warm-up, excess vapour generation can cause a significant rise in tank pressure. LD compressors may be used to redirect this vapor to the engines for propulsion.
    • To start the Low Duty Compressor, first open the inlet, outlet, and main engine valves.
    • LD 1: Inlet CG 901, Outlet CG 913.
    • LD 2: Inlet CG 902, Outlet CG 914.
    • ME Valves: CG 9105 and CG 9106.
    • Once the Valves are open, click on the LD Compressor icon to access the options for starting
    • In case the Tank pressures are rising further, Run the GCU as explained in the Instructional videos. Ensure the GCU inlet valve CG 940 is opened.
    • Ensure temperature increases from -110°C to -90°C and pressure is stabilized to complete the exercise.

Proper line up for warming up step 1: